Installation Guide
This chapter introduces how to install Cardinal Optimizer on all supported operating systems, and how to obtain and setup license correctly. We recommend all users ready this chapter carefully before using Cardinal Optimizer.
Registration
Before using Cardinal Optimizer, users need to registrate online and then install the COPT package on your machine. If this is not done yet, please visit official COPT home page and fill the registration form following the guidelines.
The online registration is for personal license application. Specifically, users only need to provide username of machine, besides basic information.
Upon approval, you will receive a letter from coptsales@shanshu.ai. It gives both link to download COPT software package, a license key tied with registration information, and also two attached license files. You may refer to Software Installation below and Setting Up License for further steps.
If you encountered any problems, please contact coptsupport@shanshu.ai for help.
Software Installation
Windows
We provide two types of installation packages for Windows operating systems,
The user need to choose one of the two options.
One is an executable installer (Download link name contains installer) for most of users and the other one is a zip-format archive specialized for expert users.
The executable installer provides a visual installation prompt window and automatically configures environment variables. Users only need to follow the instructions and click to complete the installation steps in sequence; The ZIP format installation package requires the user to decompress the installation package first and manually configure the environment variables.
Executable installer: CardinalOptimizer-8.0.5-win64-installer.zip
ZIP-format installation package: CardinalOptimizer-8.0.5-win64.zip
We recommend users to download the excecutable installer.
Executable installer
If you download the executable installer for Windows from our website, e.g. CardinalOptimizer-8.0.5-win64-installer.exe for 64-bit version of COPT 8.0.5, just double-click it and follow the following guidance:
Step 1: Click the installer and select the installation language. The default installation language is
English, users can change it by select from the drop-down menu, see Fig. 1. Here we use the default setting.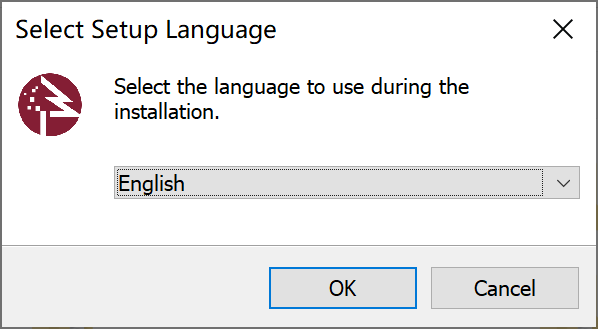
Fig. 1 Select installation language
Step 2: If you agree with the
'End-User License Agreement (EULA)', just choose'I accept the agreement'and then click'Next'. The software won’t install if you disagree with theEULA, see Fig. 2.
Fig. 2 License agreement page
Step 3: By default, the installer will place all files into directory C:\Program Files\copt80, you may change it to any directories. If you have decided the install directory, just click
'Next', see Fig. 3.
Fig. 3 Choose install directory
Step 4: To select the start menu folder, you can simply use the default setting and click
'Next', see Fig. 4.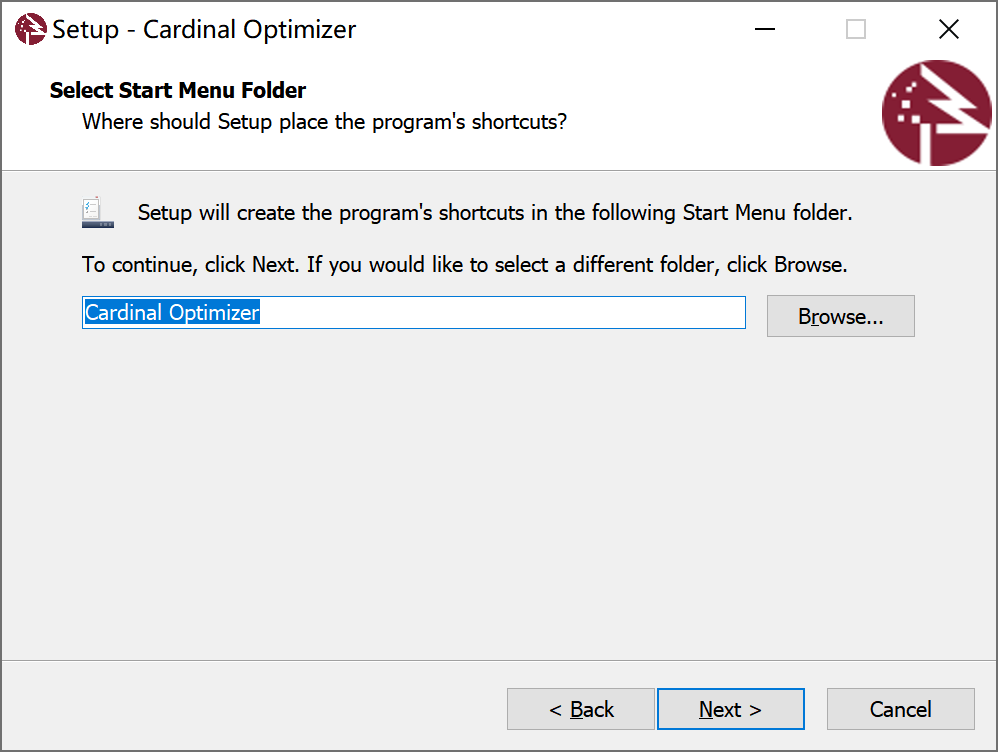
Fig. 4 Select start menu folder
Step 5: By now, the software is ready to install, just click
'Install', see Fig. 5.
Fig. 5 Ready to install
Step 6: When installation completed, the software requires restart of your machine since the installer has automatically made the required modifications to environment variables for you. Be sure to save your working files and close other running applications before restart, and then click
'Finish', see Fig. 6.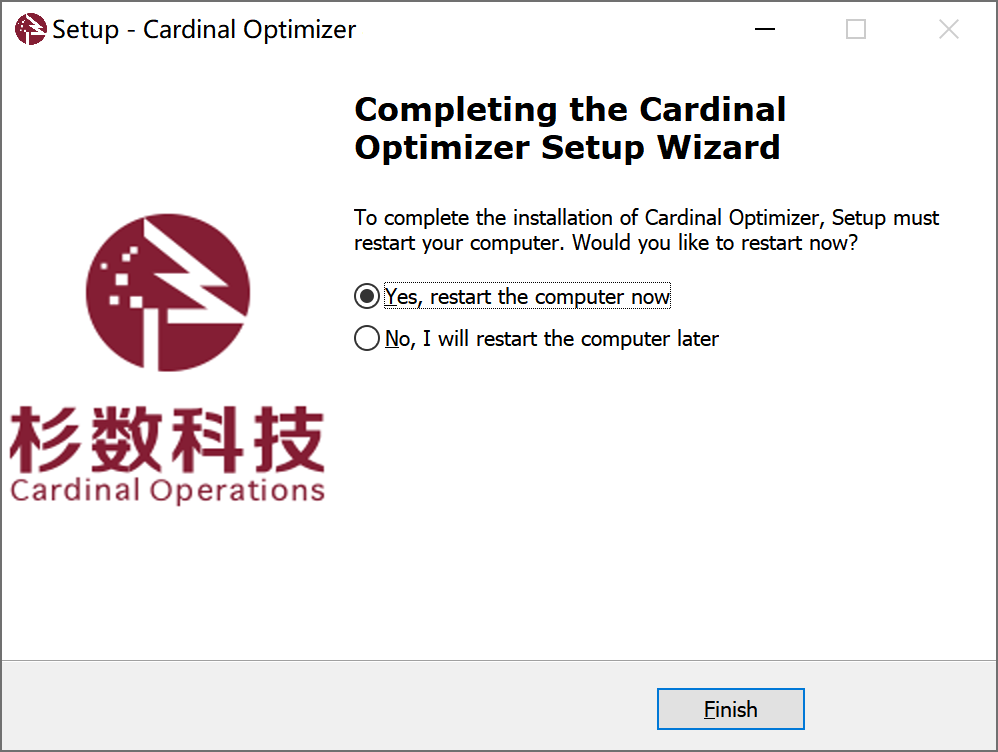
Fig. 6 Installation completed and restart your machine
Zip-format installer archive
If you downloaded the zip-format installer archive, just uncompress it to any directories with any unarchiver and set up environment variables as follows. Here we assumed the installation directory to be C:\Program Files\copt80:
Step 1: Open
Command Prompt (cmd)with administrator priviledge and execute the following command to pop-up the environment variables setting panel.rundll32 sysdm.cpl,EditEnvironmentVariables
Step 2: Add directory C:\Program Files\copt80\bin to system environment variable
PATH.Step 3: Create a new system environment variable named
COPT_HOME, whose value is C:\Program Files\copt80.Step 4: Create a new system environment variable named
COPT_LICENSE_DIR, whose value is C:\Program Files\copt80.
Up to now, you have already setup the required modifications to the environment
variables. If you accept the copt-eula_en.pdf in installation directory,
then please go to Setting Up License for license issues.
MacOS
We provide two types of installation packages for MacOS, one is a DMG-format installer for most of users and the other is a gzip-format archive for expert users. The user need to choose one of the two options.
In addition, for MacOS systems, we provide the MacOS-Universal installation package,
which is universal to both Apple Silicon and old Intel chips (the installation package suffix is universal_mac).
DMG-format installer: CardinalOptimizer-8.0.5-universal_mac.dmg
Gzip-format Archive: CardinalOptimizer-8.0.5-universal_mac.tar.gz
We recommend users to download the DMG-format installer.
DMG installer
If you download the DMG-format installer for MacOS-Universal from our website, e.g. CardinalOptimizer-8.0.5-universal_mac.dmg of COPT 8.0.5, please follow the following guidance to install the software:
Step 1: Double-click the DMG-format installer, waiting for the OS to mount the DMG installer automatically.
Step 2: Simply drag the copt80 folder into
'Applications'folder, see Fig. 7: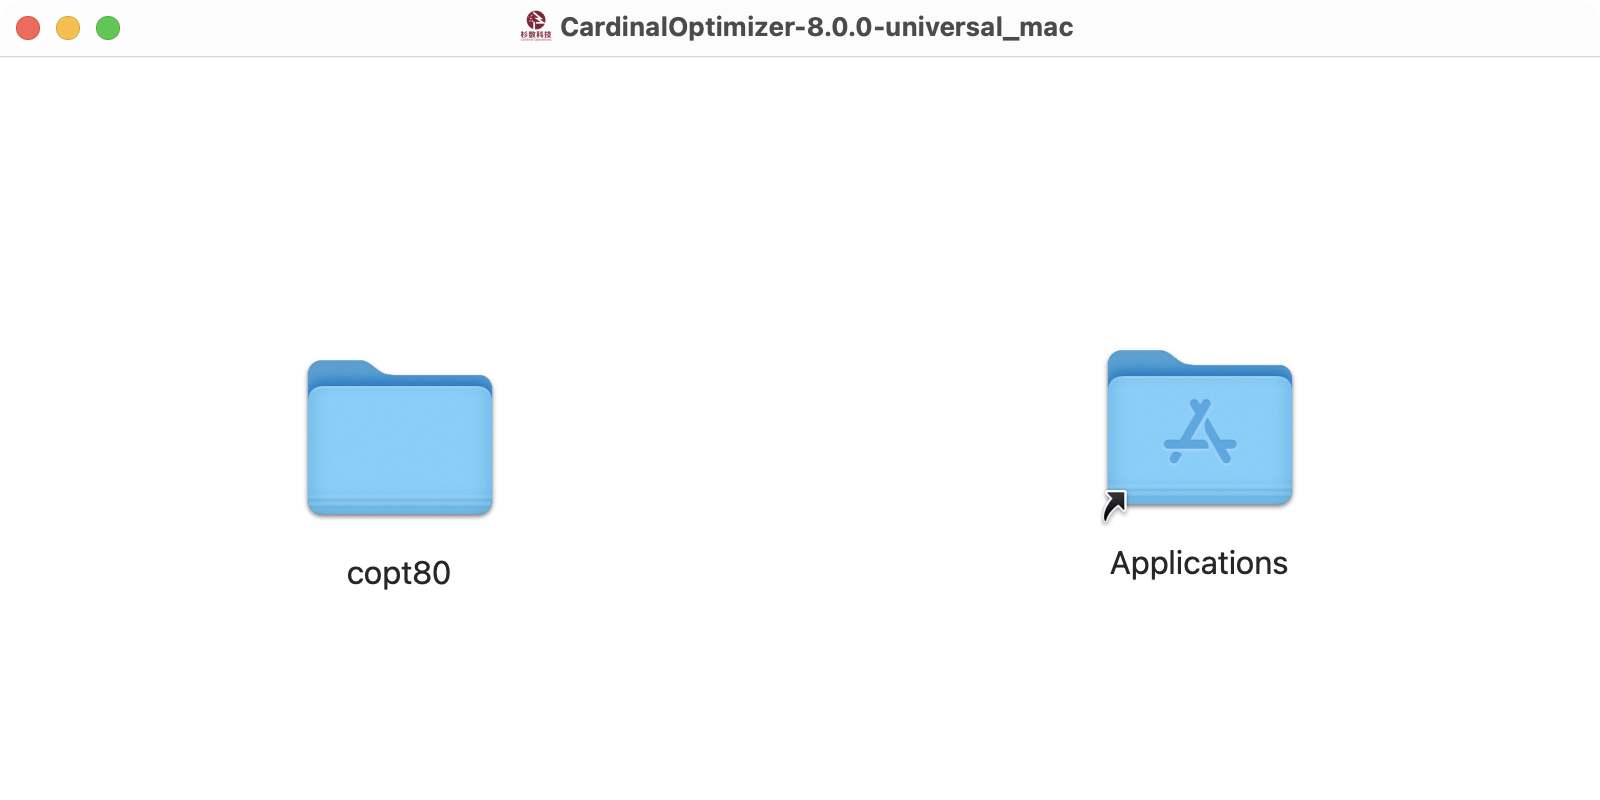
Fig. 7 Drag copt80 into
'Applications'
After the above steps are completed, the necessary environment variables need to be configured. Please continue to read: Environment variable configuration section.
GZIP installer
If you download the gzip-format installer archive, just uncompress it to any directories with commands:
tar -xzf CardinalOptimizer-8.0.5-universal_mac.tar.gz
You will get a folder named copt80 in current directory, you can move it
to any other directories as you want. We recommend users move it to the
'Applications' folder by executing commands below:
mv copt80 /Applications/
After the above steps are completed, the necessary environment variables need to be configured. Please continue to read: Environment variable configuration section.
Environment variable configuration
The next step for both DMG-format and gzip-format installer is to setup the environment variables.
First, please execute the following command on the terminal to determine the current Shell version:
echo $SHELL
If the output is: '/bin/bash', it means that the current terminal is bash;
if the output is: '/bin/zsh', It means that the current terminal is zsh.
Next, please open the terminal and confirm that you are in the user directory (if not, you need to execute the following command to switch to the user directory):
cd ~/
Please refer to the corresponding environment variable configuration guide according to the terminal.
After the environment variable is configured, you can verify whether the configuration is successful, refer to Verify the environment variable.
BASH terminal
There are three main steps to configure environment variables under the BASH terminal:
1. Check ‘bash_profile’ file
Enter the following command to output all files in the user directory
and check whether there is a '.bash_profile' hidden file:
ls -a
If the file does not exist, execute the following command to create an empty '.bash_profile' file at your own (if the file already exists, please ignore this step):
touch ~/.bash_profile
2. Add environment variables
First, please execute the following command to open the '.bash_profile' file.
open ~/.bash_profile
Next, please add the following content to the '.bash_profile' using any editors that you prefered:

Note: There can be no spaces on both sides of the equal sign.
3. Check the environment variables to take effect
Save the above modification and exit, the user can execute the following command in the terminal to view the modified '.bash_profile' file:
cat ~/.bash_profile
If the modification is successful, the content of the file output should include the newly added information above.
Then, the user needs to execute the following command on the terminal to make the above modification take effect.
source ~/.bash_profile
ZSH terminal
Likewise, there are three main steps to configure environment variables under the ZSH terminal:
1. Check ‘zshrc’ file
Enter the following command to output all files in the user directory
and check whether there is a '.zshrc' hidden file:
ls -a
If the file does not exist, execute the following command to create an empty '.zshrc' file at your own (if the file already exists, please ignore this step):
touch ~/.zshrc
2. Add environment variables
First, please execute the following command to open the '.zshrc' file.
open ~/.zshrc
Next, please add the following content to the '.zshrc' using any editors that you prefered:

3. Check the environment variables to take effect
Save the above modification and exit, the user can execute the following command in the terminal to view the modified '.zshrc' file:
cat ~/.zshrc
If the modification is successful, the content of the file output should include the newly added information above.
Then, the user needs to execute the following command on the terminal to make the above modification take effect.
source ~/.zshrc
Verify environment variable configuration
Now open a new terminal to check if the previous modifications work by executing commands below respectively:
echo $COPT_HOME
echo $COPT_LICENSE_DIR

echo $PATH
echo $DYLD_LIBRARY_PATH
If the terminal outputs respectively:
/Applications/copt80
/Applications/copt80
/Applications/copt80/bin:$PATH
/Applications/copt80/lib:$DYLD_LIBRARY_PATH
It means that the COPT-related environment variables are configured successfully.
Notes: The environment variables $PATH and $DYLD_LIBRARY_PATH may display different contents on different computers. However, the set COPT-related environment variables should be displayed normally to indicate that the configuration is successful.
If the user checks that the COPT-related environment variables have been successfully added, please carefully read the user agreement document 'copt-eula_cn.pdf' in the installation directory. If you accept the the agreement, please go to Setting Up License for license issues.
MacOS Security Checkup
For MacOS 10.15 (Catalina), if users received error message below:
"libcopt.dylib" cannot be opened because the developer cannot be verified.
macOS cannot verify that this app is free from malware.
or
"libcopt_cpp.dylib": dlopen(libcopt_cpp.dylib,6): no suitable image found.
Did find: libcopt_cpp.dylib: code signature in (libcopt_cpp.dylib) not valid
for use in process using Library Validation: library load disallowed by
system policy.
Then execute the following commands:
xattr -d com.apple.quarantine CardinalOptimizer-8.0.5-universal_mac.dmg
xattr -d com.apple.quarantine CardinalOptimizer-8.0.5-universal_mac.tar.gz
or
xattr -dr com.apple.quarantine /Applications/copt80
to disable security check of MacOS.
Linux
For Linux platform, we support X86 and ARM64 architectures and provide packages in GZIP format.
The installation package names differ from different architectures:
Linux-X86: CardinalOptimizer-8.0.5-lnx64.tar.gz
Linux-ARM64: CardinalOptimizer-8.0.5-aarch64_lnx.tar.gz
If you download the software, e.g. CardinalOptimizer-8.0.5-lnx64.tar.gz for 64-bit version of COPT 8.0.5, just type commands below in shell to extract it to any directories:
tar -xzf CardinalOptimizer-8.0.5-lnx64.tar.gz
You will get a folder named copt80 in current directory, you can move it
to any other directories as you like. We recommend users move it to '/opt'
directory by typing commands below in shell:
sudo mv copt80 /opt/
Note that the above command requires root privilege to execute.
The next step users need to do is to set the required environment variables,
by adding the following commands to the '.bashrc' file in your $HOME
directory using any editors that you prefered:

Remember to save your modifications to the '.bashrc' file, and open a new
terminal to check if it works by executing commands below respectively:
echo $COPT_HOME
echo $COPT_LICENSE_DIR

echo $PATH
echo $LD_LIBRARY_PATH
If you accept the copt-eula_en.pdf in installation directory, then please
go to Setting Up License for license issues.
Setting Up License
The Cardinal Optimizers requires a valid license to work properly. We offer different types of licenses most suitable for user’s needs. All users should read this section carefully. If you encounter any problem about license, feel free to contact coptsupport@shanshu.ai.
The license specifically includes: license.dat and license.key two files.
Starting from COPT 6.5, if you apply for personal license applications via our official website,
we will send both files directly as attachments (no need to obtain it yourself).
Users can directly download two license files to the local computer, skip the following steps of obtaining and verifying the license , and can go straight to the Install license step.
The configuration of the license mainly includes the following three steps:
Obtaining License
Once the registration is done, a license key is sent to
users. It is a unique token binding with user’s registration
information. Afterwards, users may
run the copt_licgen tool, shipped with Cardinal Optimizer, to
obtain license files from COPT licensing server (Internet connection required) .
Note: If the user has already obtained the two files license.dat and license.key, there is no need to repeat the following steps to obtain them again.
The following notes show you how to play with the copt_licgen tool.
For Windows system, open a new cmd window. The current path is the user directory, and the path is as follows:
"C:\Users\copt80".
For MacOS and Linux systems, open a new terminal. The current path is the user directory, represented by the symbol ~.
To obtain COPT license files, execute the following command using the option
'-key' and the license key as argument. Below is an example, assuming
the license key is '19200817f147gd9f60abc791def047fb':
copt_licgen -key 19200817f147gd9f60abc791def047fb
If the license key is saved to key.txt file in format of 'KEY=xxx',
which resides in the same place
as copt_licgen, execute the following command using the option '-file'
and 'key.txt' as arugment.
copt_licgen -file key.txt
We recommend to use the first way to get your license files.
If the authorization server verifies the license, then it generates license.dat and license.key
and download it to the user’s computer. The default download directory is the current working directory.
copt_licgen -key 19200817f147gd9f60abc791def047fb
  [Info] Cardinal Optimizer   COPT v8.0.5 20240304
  [Info] Use specific key 19200817f147gd9f60abc791def047fb
  [Info] * get new COPT license from licensing server *
  [Info] Write to license.dat
  [Info] Write to license.key
  [Info] Received new license files from server
  [Info] Done !!!
Note: Users do not need to have internet connection to run COPT. However, obtaining license itself requires internet connection. If you encounter any problem, please feel free to contact coptsupport@shanshu.ai.
Verifying License
If the license key binding to registration information is verified by COPT
license server, two license files, license.dat and license.key, are
downloaded to the current working directory. To double check two
license files are valid in current version of COPT, execute the following command
with the option '-v'. Note that this command requires both license.dat
and license.key existing in the current working directory.
copt_licgen -v
If you see log information similar to the following, you have obtained and verified the license files sucessfully.
copt_licgen -v
  [Info] Cardinal Optimizer   COPT v8.0.5 20240304
  [Info] Run local validation
  [Info] Read license.dat
  [Info] Read license.key
  [Info] Expiry : Tue 2030-12-31 00:00:00 +0800
  [Info] Local validation result: Succeeded
  [Info] Done !!!
Installing License
Once you obtained the license.dat and license.key files from COPT
license server and verified they work as expected, setting up them is just
as simple as moving them to the same directory as the COPT dynamic libary
or COPT Command-Line. Note this installation is applied only to current
COPT.
The following two ways of installation applied to all versions of COPT on your machine.
Via HOME directory method (recommended)
The simplest way to install COPT license is to create a folder of copt
in your HOME directory, and move the authenticated license files
license.dat and license.key to the new folder copt.
Note: The folder name "copt" is case sensitive and it must be lowercase.
The HOME directory names are slightly different under different systems,
please refer to the corresponding license installation steps according to your operating system:
Windows
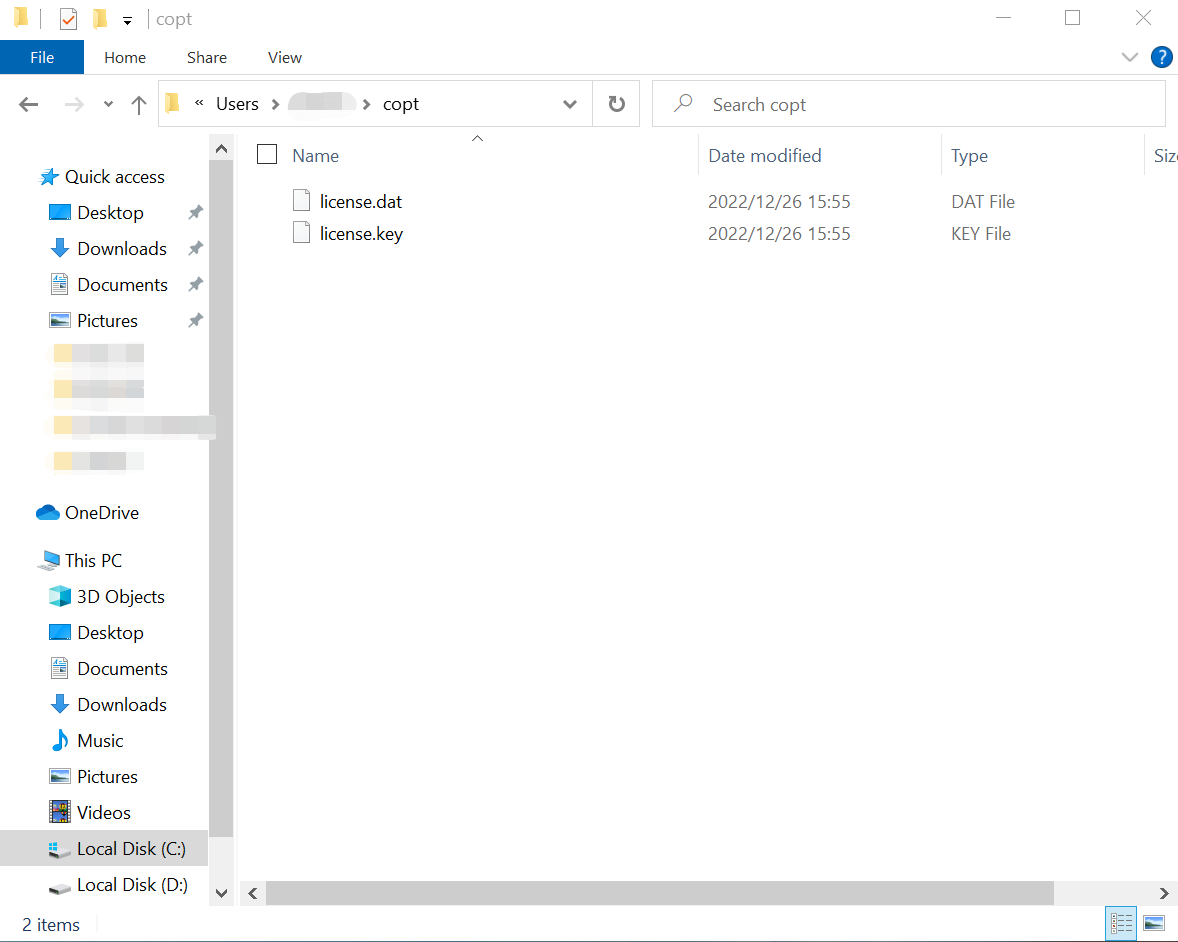
The HOME directory looks like "C:\Users\username\" on Windows. User can manually move
the two license files license.dat and license.key to the directory "C:\Users\username\copt".
Finally, please check whether the license files license.dat and license.key are located in this directory, as shown in the figure below, indicating that the license has been installed correctly:
MacOS
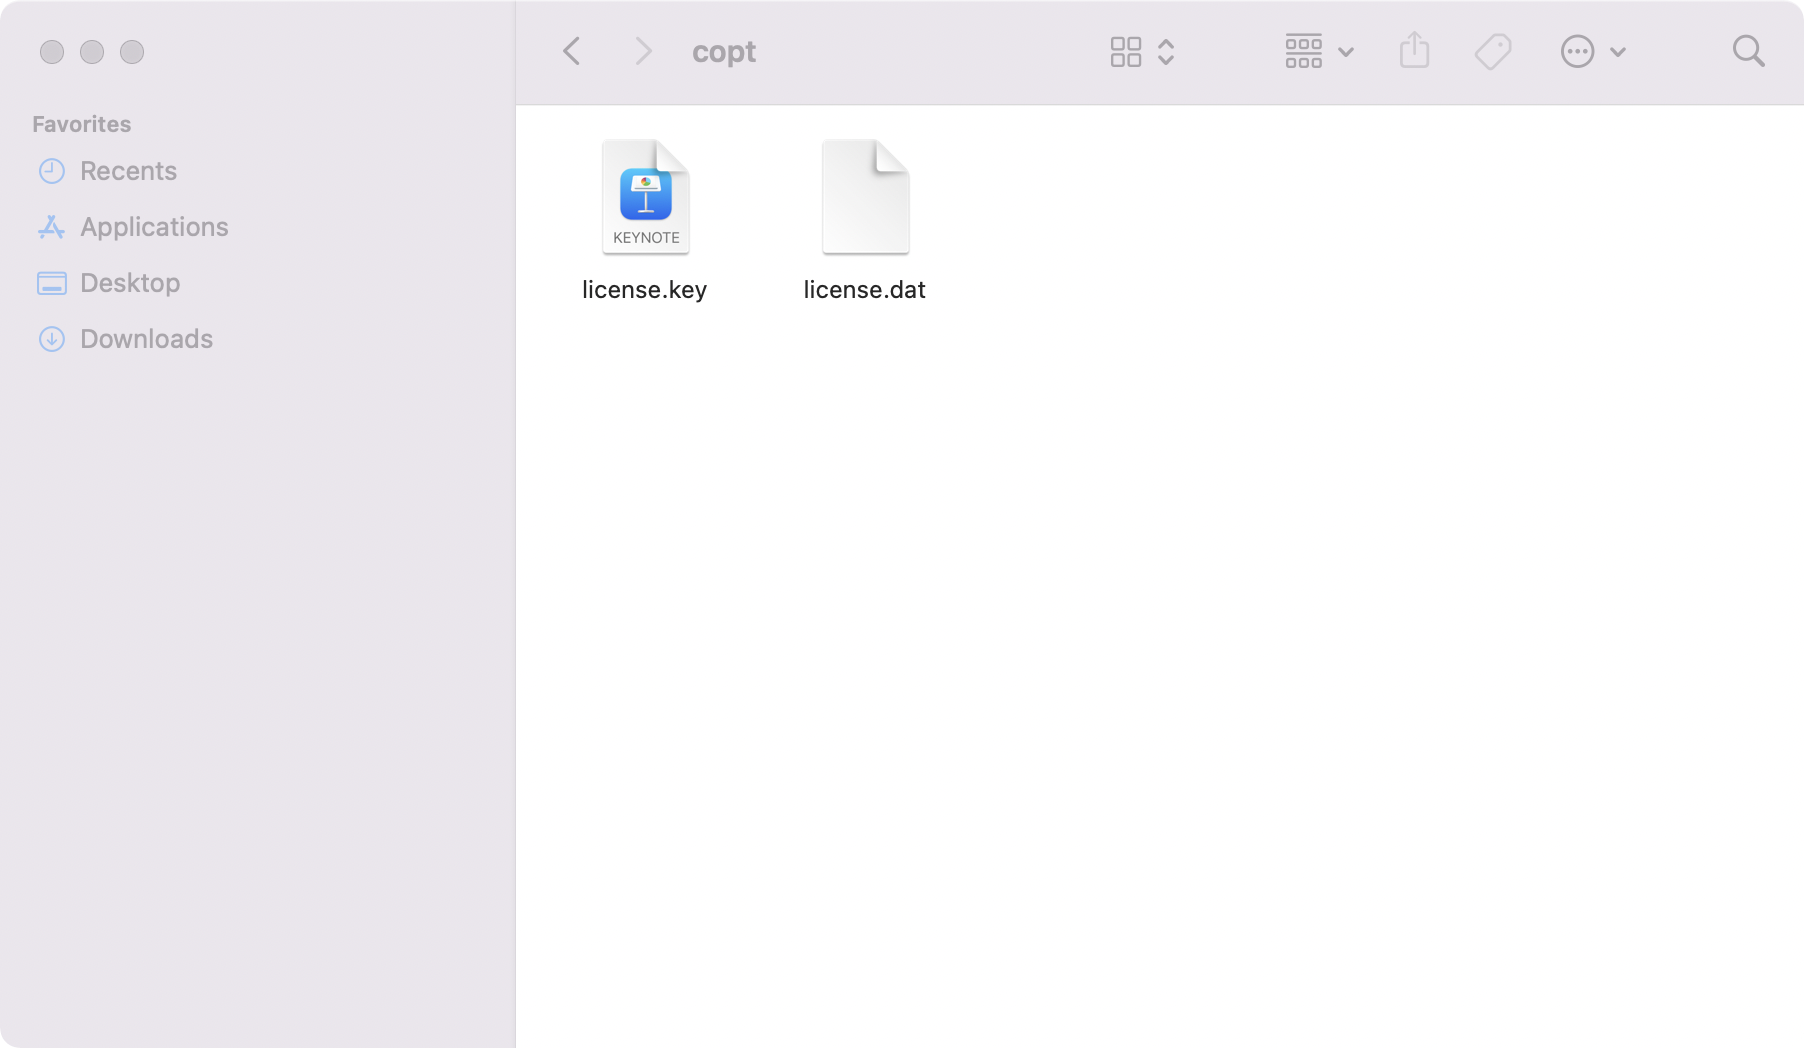
The HOME directory looks like "/home/your username/"
on MacOS. User can manually move
the two license files to "/home/your username/copt/".
Finally, please check whether the license files license.dat and license.key are located in this directory, as shown in the figure below, indicating that the license has been installed correctly:
Linux
The HOME directory looks like "/home/your username/"
on Linux.
User can execute the following command in the terminal to move the two license files license.dat and license.key to the directory "/home/your username/copt".
mv license.* ~/copt/
Next, please check that the license files license.dat and license.key are located in "/home/username/copt"
directory, the command is:
ls ~/copt/
If the terminal output shows that there are two files license.dat and license.key, it means that the license has been installed correctly, otherwise the installation fails.
Via environment variable method
Alternatively, for users who prefer having licenses in a customized folder, they can set
environment variable COPT_LICENSE_DIR to the customized folder. You may refer
to Software Installation for how to set environment variable on Windows, Linux
and MacOS.
In addition, please double check that if license files license.dat and license.key
locate in path specified by environmental variable COPT_LICENSE_DIR.
The viewing and operation of environment variables are slightly different under different systems, please refer to the following installation steps for your own operating system:
Windows
For Windows systems, execute the following command to view the path pointed to by the environment variable COPT_LICENSE_DIR :
echo %COPT_LICENSE_DIR%
Note: If there is no output on the terminal, it means that the COPT-related environment variables have not been configured, please check Software installation.
Then move the license files license.dat and license.key to the path COPT_LICENSE_DIR
points to.
Here we assume that the environment variable COPT_LICENSE_DIR points to the default installation directory of COPT. As shown in the figure, it means that the license has been installed correctly:
MacOS
For MacOS system, you can use the following command to view the path pointed to by the environment variable COPT_LICENSE_DIR:
echo $COPT_LICENSE_DIR
Then move the license files license.dat and license.key to the path COPT_LICENSE_DIR
points to.
Here we assume that the environment variable COPT_LICENSE_DIR points to the default installation directory of COPT. As shown in the figure, it means that the license has been installed correctly:
Linux
For Linux systems, user can use the following command to view the path pointed to by the environment variable COPT_LICENSE_DIR:
echo $COPT_LICENSE_DIR
Then user can execute the following command to move the license files license.dat and license.key to to the path COPT_LICENSE_DIR points to.
mv license.* $COPT_LICENSE_DIR/
Note: For Linux systems, if the path pointed to by the environment variable COPT_LICENSE_DIR is /opt/copt80, user need to perform the move operation with root authority , and the command is:
sudo mv license.* $COPT_LICENSE_DIR/
In addition, please double check that if license files license.dat and license.key
locate in path specified by environmental variable COPT_LICENSE_DIR , and the command is:
ls $COPT_LICENSE_DIR/
If the terminal displays the files license.dat and license.key, it means that the license has been installed correctly, otherwise the license installation fails.
Note: If there are license files license.dat and license.key in the copt folder of the user directory and the directory pointed to by the environment variable, the former will be checked and used the former.
Others
Basically, each type of licenses includes two license files: license.dat
and license.key, each of which has digital signature to protect its
content. When invoking COPT command-line or loading COPT dynamic library
to solve an optimization problem, the public RSA key stored in 'license.key'
is used to verify signature in 'license.dat'.
Afterwards, license data in format of key-value pair is parsed to verify whether it is a legal license. Below is a sample of license data.
## COPT LICENSE FILE ##

USER = Trial User
MAC = 44:05:99:31:41:C2
CPUID = BFEBFBFF000706E5
EXPIRY = 2030-12-31
VERSION = 8.0.5
NOTE = Free For Trial
Note: Please make sure that the VERSION field in the license file is the same major version as the software installed on the machine. Otherwise, it may cause error:
Invalid signature in public key file .
Verify the installation and configuration
After the user completes the above steps of software installation and license configuration, please enter the COPT command line tool to verify whether the installation is successful.
In MacOS and Linux systems, please open the terminal (in Windows system, please open the cmd window), and enter the copt_cmd command to use the COPT command line tool.
If the user sees the output as shown below (without any error message), the COPT command line tool can be entered normally, which means that the previous software and license configuration has been successfully completed.
Cardinal Optimizer v8.0.0. Build date Oct 17 2024
Copyright Cardinal Operations 2024. All Rights Reserved

COPT>
If you fail to enter the COPT command line tool normally, please refer to FAQ according to the error message and check whether the above steps of installation and license configuration are completed correctly.
After the installation is successfully completed, according to the interface of COPT as needed, please continue to refer to Quick Start, and check the installation and applying methods of each interface.
Upgrade
The upgrade steps of COPT mainly include two parts: 1. Software upgrade; 2. License file update.
1. Uninstall the old version of COPT
Firstly, if the user does not need to run multiple versions at the same time, the old version of the software can be uninstalled first.
For different operating systems, the methods of uninstalling COPT are slightly different:
In Windows system, please open the old COPT installation package (named like copt80 ), please double-click to run unins000.exe , and then the software can be uninstalled automatically. In MacOS and Linux systems, please delete the old version of the COPT installation package directly to complete the software uninstallation.
2. Install the new version of COPT
If it is an upgrade between major versions (for example: COPT 6.5 -> COPT 7.0), the user needs to re-apply for new version license. Next, the user needs to reinstall the new version of COPT. For the same steps, please refer to Software Installation.
3. Update the license files
In addition, after the software update is complete, the license file needs to be updated. We recommend that the user configure the license file via user directory. The user only needs to delete the license file of the old version under the copt folder and move the new license file into it to complete the license update.
After completing the above steps, users can refer to Verify installation and configuration completion to observe whether the version number in the banner information output by the COPT command line tool is a new version.
Notes
For the Python interface of COPT, users also need to upgrade its corresponding interface
coptpyat the same time. If Python is an Anaconda distribution, it can be conducted viapip install --upgrade coptpy.The above are the upgrade steps for major version iterations (for example: COPT 6.5 -> COPT 7.0). In addition, on the basis of each major version, COPT will also provide patch release (eg: COPT 8.0.1 -> COPT 8.0.2), for some feature fixes and updates. For upgrades between minor versions, there is no need to update the license files.